Using Excel built-in dialogs
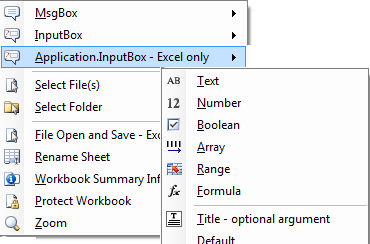
The built-in dialogs from the Excel user interface can be called from VBA. For example you can open the dialog to set a Font, to define Names, etcetera. In fact there are many such dialogs, I counted 258 - how useful are these for your Excel programs? My conclusion after examining them is that only half a dozen or so are worth the trouble. Only these are included in the Excel VBA menu. These are discussed below.
All dialogs mentioned here are available in Excel through the menu:
| Alt-CU | Menu: Code VBA » User Interaction |
| Notes |
|---|
|
Dialog Open file (xlDialogOpen)
This is the Excel Open excel file dialog. Opening the files this way allows you to set features in advance such as filename filter and the password protection.
Dim strFilename As String: strFilename = "C:\temp\exceldialogs.xls"
Dim bytUpdateLinks As Boolean: 'bytUpdateLinks = 0
Dim booReadOnly As Boolean: 'booReadOnly = False
Dim xlfFileFormat As XlFileFormat: 'XlfFileFormat = XlFileFormat.xlOpenDocumentSpreadsheet
Dim strPassword As String: 'strPassword = "password"
Dim strWriteReservationPassword As String: 'strWriteReservationPassword = "password2"
Dim booIgnoreReadOnlyRecommendation As Boolean: 'booIgnoreReadOnlyRecommendation = True
Dim intFileOrigin As Integer: 'intFileOrigin = 2
Dim strCustomDelimiter As String: 'strCustomDelimiter = " "
Dim booAdd As Boolean: 'booAdd = True
Dim booEditable As Boolean: 'booEditable = True
Dim intFileAccess As Integer: 'intFileAccess = 1
Dim booNotify As Boolean: 'booNotify = True
Dim intConverter As Integer: 'intConverter = 1
Dim booWorkbookOpeneded As Boolean
booWorkbookOpeneded = Application.Dialogs(xlDialogOpen).Show(Arg1:=strFilename, Arg2:=bytUpdateLinks, Arg3:=booReadOnly, Arg4:=xlfFileFormat, _
                                Arg5:=strPassword, Arg6:=strWriteReservationPassword, Arg7:=booIgnoreReadOnlyRecommendation, _
                                Arg8:=intFileOrigin, Arg9:=strCustomDelimiter, Arg10:=booAdd, Arg11:=booEditable, Arg12:=intFileAccess, _
                                Arg13:=booNotify, Arg14:=intConverter)
UpdateLinks
UpdateLinks specifies whether and how to update external and remote references. If update_links is omitted, Microsoft Excel displays a message asking if you want to update links:
0 Updates neither external nor remote references
1 Updates external references only
2 Updates remote references only
3 Updates external and remote references
ReadOnly
Whether to recommend to the user that the file be opened in read-only mode.
FileFormat
FileFormat specifies what character to use as a delimiter when opening text files. If format is omitted, Microsoft Excel uses the current delimiter setting. If FileFormat is one of the following values are separated by 1 Tabs, 2 Commas, 3 Spaces, 4 Semicolons, 5 Nothing, 6 Custom Characters.
IgnoreReadOnlyRecommendation
IgnoreReadOnlyRecommendation controls whether the read-only recommended message is displayed. If IgnoreReadOnlyRecommendation is TRUE, Microsoft Excel prevents display of the message; if FALSE or omitted, and if read_only is also FALSE or omitted, Microsoft Excel displays the alert when opening a read-only recommended workbook.
FileOrigin
FileOrigin is a number specifying whether a text file originated on the Macintosh or in Windows. When omitted the current operating environment is used.
1 Macintosh
2 Windows (ANSI)
3 MS -DOS(PC - 8)
CustomDelimiter
CustomDelimiter is the character you want to use as a custom delimiter when opening text files. CustomDelimiter is text or a reference or formula that returns text, such as CHAR(124). CustomDelimiter is required if format is 6; it is ignored if format is not 6. Only the first character in CustomDelimiter is used.
Add
Add is a logical value that specifies whether or not to add file_text to the open workbook. If add_logical is TRUE, the document is added; if FALSE or omitted, it is not added. This argument is for compatibility with workbooks from Microsoft Excel version 4.0.
Editable
Editable is a logical value that corresponds to opening a file (such as a template) while holding down SHIFT key. If TRUE, editable is the equivalent to holding down the SHIFT key while choosing the OK button in the Open dialog box. If FALSE or omitted, this argument is ignored.
FileAccess
FileAccess is a number specifying how the file is to be accessed. If the file is being opened for the first time, this argument is ignored. If the file is already opened, this argument determines how to change the User s access permissions for the file:
1 Revert to saved copy
2 Change to read/write access
3 Change to read only access
Notify specifies whether the user should be notified when the shared document is available to be opened across a network. If TRUE, the user will be notified when the d ocument is available to be opened. If FALSE or omitted, the user will not be notified when the file available to be opened.
Converter
Converter is a number corresponding to the file converter to use to open the file. Normally, Microsoft Excel automatically determines which file converter to use; therefore, this argument can usually be excluded. If you want to be certain, however, that a specific manually installed converter be used, then include this argument. Use GET.WORKSPACE(62) to determine which numbers corresponds to all of the installed converters.
Dialog Save As (xlDialogSaveAs)
This is the Excel file Save As dialog. Opening the files this way allows you to set features in advance such as excel filetype, possible recommendation for opening read only and password protection.
http://www.mrexcel.com/forum/excel-questions/277719-compromise-between-getsaveasfilename-xldialogsaveas.html
Dim strFilename As String: strFilename = "report1"
Dim strFolder As String: strFolder = "C:\temp\" 'initial directory - NOTE: Only works if file has not yet been saved!
Dim xlfFileFormat As XlFileFormat: xlfFileFormat = XlFileFormat.xlOpenXMLWorkbook 'or replace by other XlFileFormat
Dim strPassword As String: 'strPassword = "password" 'The password with which to protect the file - if any
Dim booBackup As Boolean: 'booBackup = True  '(Whether to create a backup of the file.)
Dim strWriteReservationPassword As String: 'strWriteReservationPassword = "password2" ' (The write-reservation password of the file.)
Dim booReadOnlyRecommendation As Boolean: booReadOnlyRecommendation = False '(Whether to recommend to the user that the file be opened in read-only mode.)
Dim booWorkbookSaved As Boolean ' true if file saved, false if dialog canceled
If Len(strFolder) > 0 Then ChDir strFolder
booWorkbookSaved = Application.Dialogs(xlDialogSaveAs).Show(Arg1:=strFilename, Arg2:=xlfFileFormat, Arg3:=strPassword, _
                                            Arg4:=booBackup, Arg5:=strWriteReservationPassword, Arg6:=booRea
Dialog Send Mail (xlDialogSendMail)
This statement opens an email with the active workbook attached. It's simple, but limited in use considering there are only three arguments to choose from. You can only specify one recipient, and you can't include body text. It does provide with a quick way to send the excel file and request a return receipt.
Dim strRecipient As String: strRecipient = "[email protected]"
Dim strSubject As String: strSubject = "Latest data in attached file"
Dim booReturnReceipt As Boolean: booReturnReceipt = True
Application.Dialogs(xlDialogSendMail).Show Arg1:=strRecipient, Arg2:=strSubject, Arg3:=booReturnReceipt
Rename sheet (xlDialogWorkbookName)
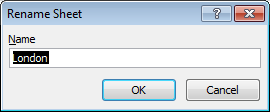
The code below opens the Excel built-in dialog to rename a sheet. The first argument is used to give the current name of the sheet, the second specifies the new name
| Note |
|---|
| xlDialogWorkbookName is a confusing name choosen to identify this dialog. |
Dim strCurrentSheetName As String: strCurrentSheetName = "Sheet1"
Dim strNewSheetName As String: strNewSheetName = "London"
Application.Dialogs(xlDialogWorkbookName).Show Arg1:=strCurrentSheetName, Arg2:=strNewSheetName
Dialog Properties / Summary Info / (xlDialogProperties, xlDialogSummaryInfo)
Open the workbook properties dialog to allow the user to specify or view summary details such as subject and author.
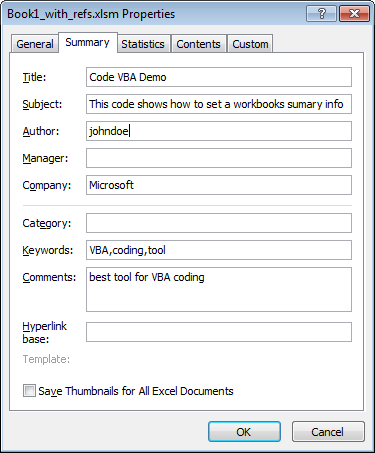
Dim strTitle As String: strTitle = "Code VBA Demo"
Dim strSubject As String: strSubject = "This code shows how to set a workbooks sumary info"
Dim strAuthor As String: strAuthor = Environ$("USERNAME")
Dim strKeywords As String: strKeywords = "VBA,coding,tool"
Dim strComments As String: strComments = "best tool for VBA coding"
Application.Dialogs(xlDialogProperties).Show Arg1:=strTitle, Arg2:=strSubject, _
                                             Arg3:=strAuthor, Arg4:=strKeywords, Arg5:=strComments
Dialog Workbook Protect (xlDialogWorkbookProtect)
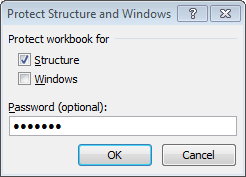
You can open the dialog only to set the protection, not to change it or unprotect. Once the workbook is protected the dialog will not open.
booProtected = Application.Dialogs(xlDialogWorkbookProtect).Show(booProtectStructure, booProtectWindows, strPassword)
Dim booProtectStructure As Boolean: booProtectStructure = True
Dim booProtectWindows As Boolean: booProtectWindows = False
Dim strPassword As String: strPassword = "mypassw"
Dim booProtected As Boolean
booProtected = Application.Dialogs(xlDialogWorkbookProtect).Show(booProtectStructure, booProtectWindows, strPassword
Dialog Zoom (xlDialogZoom�)
The Zoom Dialog can be started with preset magnification.
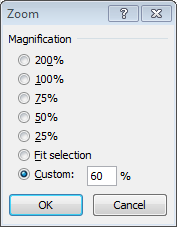
Dim strMagnification As String: strMagnification = "60"
Application.Dialogs(xlDialogZoom).Show strMagnification